NOTE:
THIS IS VERY OLD CODE AND A PAIN IN THE REAR TO USE
PLEASE
DO YOURSELF A FAVOR AND CHECK OUT ZEFIE’S CODE FIRST
Zefie's SDRSharp Trunking Plugin Mod
http://the.midnightchannel.net/sdr/SDRSharp_Plugins/zefie/?plugin=Trunker.ZefieMod
Reddit Thread
http://www.reddit.com/r/RTLSDR/comments/1d5jmv/updated_sdrsharp_trunking_plugin_with_settings/
Radio
Reference Thread
http://forums.radioreference.com/software-defined-radio/265660-sdr-trunking-has-been-updated.html
If
you’re a glutton for punishment, continue with this doc:
Configuring UniTrunker Support in SDRSharp
(This page powered by Microsoft Word!!!)
1
Overview
A trunked radio system is simply a system of radios in which the frequencies used are dynamically managed by a central controller. The rules and protocols of operation vary by system, but in order to effectively ‘listen’ to a trunked radio system, you must have the following:
- A receiver that is capable of receiving and decoding the trunking control channel(s) that issue commands to the participating radios.
- A receiver that is capable of being tuned automatically to the frequencies used by the trunked radio system for the calls/communication of interest.
- If the trunked radio system uses digital encoding of voice communications, additional decoding ability may be required.
2
SDRSharp
Implementation
In the present implementation for SDRSharp, the above requirements are delivered with the following components:
|
SDRSharp |
Provides radio support and routing of audio to desired output channels https://www.assembla.com/code/sdrsharp/subversion/nodes/branches/bobrich binaries: https://public-xrp.s3.amazonaws.com/Release-latest.zip Microsoft Visual C++ 2010 Runtime, which can be obtained
here: |
|
|
|
|
UniTrunker |
Provides decoding support for trunking control channels and issuance of tuning commands.
|
|
Virtual Audio Cable |
Provides audio routing between components http://software.muzychenko.net/eng/vac.htm
|
|
Digital Speech Decoder (DSD) |
Provides digital voice decoding support
|
2.1
Dual
Receiver Configuration
In this configuration, one receiver is dedicated to receiving control channel information, the other is dedicated to receiving voice calls.
2.1.1
Virtual
Audio Cable
Virtual Audio Cable may be obtained here: http://software.muzychenko.net/eng/vac.htm
A trial version is available and will functions reasonably well in this application. There is a periodic ‘trial’ watermark uttered over the channel, but the applications used to process these radio signals have fairly robust controls for handling noise. Obviously a registered version is the ideal scenario.
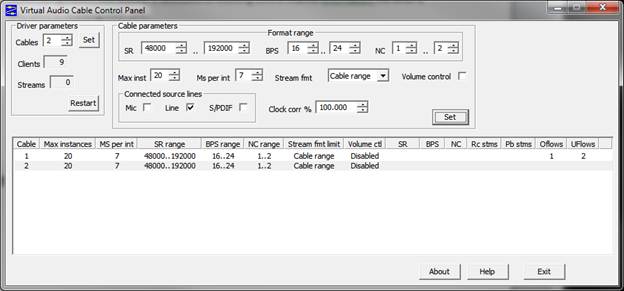
Virtual Audio Cable should be configured as follows, two channels are required if digital voice calls will be decoded. Note that all audio is processed at 48kHz.
2.1.2
Windows
Sound System Configuration
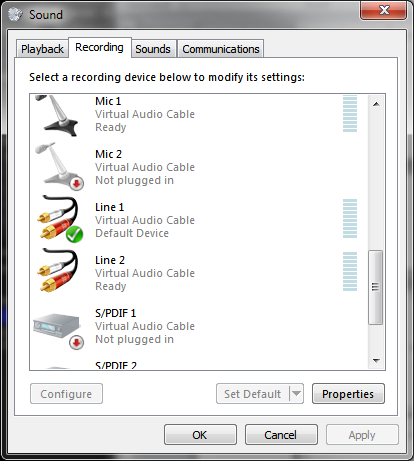
If DSD will be used, one of the VAC audio channels must be configured as the default recording device. For purposes of this document, we will select Virtual Audio Cable Line 1 as that device:
2.1.3
UniTrunker
UniTrunker is available here: http://www.unitrunker.com/download/
Version 1.0.25.2 was used for most of the development of this process and works successfully. The latest version as of July 18th is 1.0.25.4 and will be used for this document. No significant differences were noted.
2.1.3.1
Remote.dll
Note: The Remote.dll requires the Microsoft Visual C++ 2010 Runtime, which can be obtained here:
http://www.microsoft.com/en-us/download/details.aspx?id=5555
The integration between SDRSharp and UniTrunker operates through the Remote.dll which is included in the AutoTuner SDRSharp binary distribution (http://public-xrp.s3.amazonaws.com/Release-latest.zip) or may be built from the repository: (https://www.assembla.com/code/sdrsharp/subversion/nodes/branches/bobrich/UniLogger?rev=478)
This remote.dll must be copied to the UniTrunker installation directory.
2.1.3.2
Receiver
Configuration
Two receivers must be configured in UniTrunker, a ‘Signal’ receiver used to receive the control channel signal, and a ‘Control’ receiver used to receive the voice channel transmissions. This can be a little confusing as the signal that the ‘Signal’ receiver is receiving is typically called a ‘Control Channel’
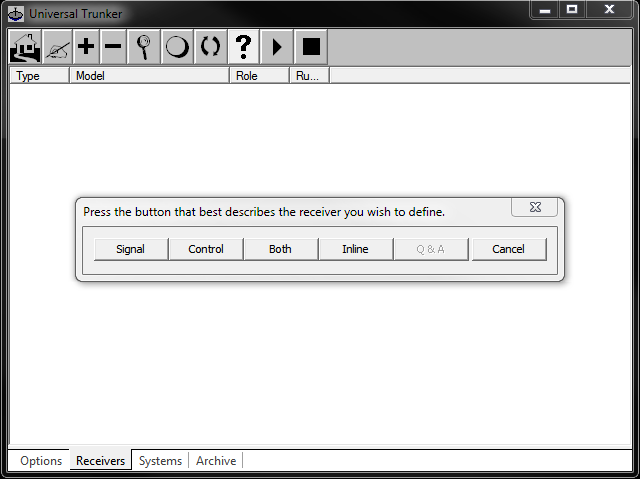
2.1.3.2.1 Signal Receiver
To create the first receiver, click the large plus sign in the tool bar and select Signal
Select the appropriate Audio Port and Sample Rate for your Virtual Audio Cable configuration. If digital voice will be used, select the Virtual Audio Cable port that is not the default recording device.

Close this window, and click the large plus sign again to create the Control receiver.
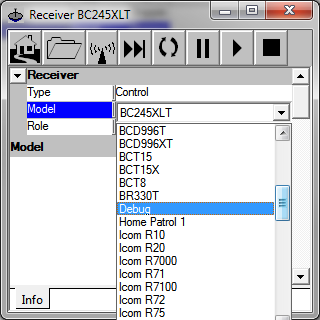
2.1.3.2.2 Control Receiver
Select ‘Control’ in the following dialog box, and configure as follows. Note: The receiver must be of Debug type or the remote.dll will not be called and this contraption will not work:
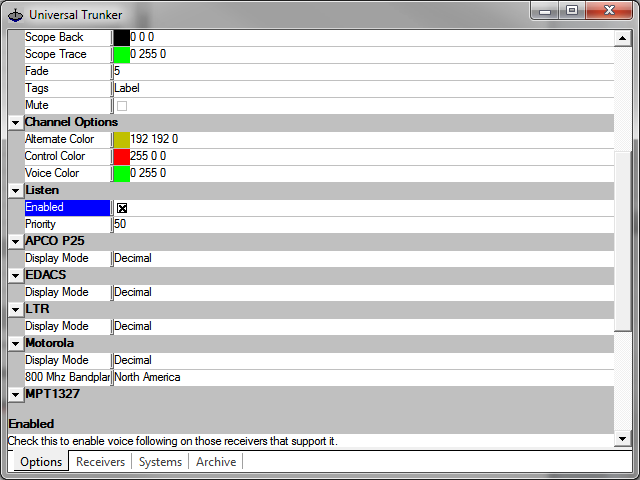
The only other step generally required is to check the P25, ProVoice or VSELP boxes if you will be decoding digital voice on those channels. Note that the trunking channels identify analog vs. digital, and UniTrunker will not tune this receiver to the correct frequency if digital modes are used and the appropriate box is not checked. I’m not aware of any downside to checking them all. (Note: This setting was not generally saved in 1.0.25.2 of UniTrunker, so if you start it up again later and doesn’t work, take a look at this setting)

Finally, in the main UniTrunker options screen, click the Enable checkbox in the Listen section:
2.1.3.3
SDRSharp
Signal Radio
2.1.3.3.1
Signal
Radio Configuration
Before starting SDRSharp, open the ‘sdrsharp.exe.config’ file and ensure this line is set as follows:
<add key="minOutputSampleRate" value="48000" />
Once configured as such, start SDRSharp, change the Front End device if necessary, click Play and tune to the control channel of interest. (If you do not have a frequency, you should be able to find one by searching the spectrum in the 850-900MHz range, or consulting sites like RadioReference.com). Ensure the mode is NFM and your filter bandwidth is set appropriately for the protocol (typically 12.5kHz). You should hear a grinding/grating noise with reasonable volume and little spurious noise.
If that all checks out, click Stop, then scroll down to the Audio section. First, uncheck the Filter Audio box, then select the correct output audio channel for your UniTrunker Signal receiver. Click ‘Play’ again, and tab back to UniTrunker. Select each receiver and click the ‘Play’ button in the toolbar until it says ‘Running’.
Within 10 seconds you should see a window like this:
2.1.4
Initializing
UniTrunker
We’re about half way there…
2.1.4.1
Frequencies
Tuning will not happen without Frequencies populated in UniTrunker. If they do not auto populate, click the little calculator icon and select the correct band-plan for your setup. Typically ‘standard’ works unless you know otherwise:
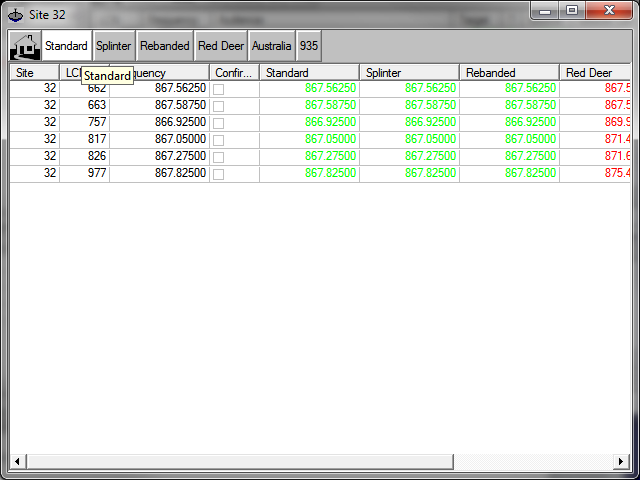
Note: If the wrong one is selected, it will be obvious when the radio is simply tuned to the wrong frequency.
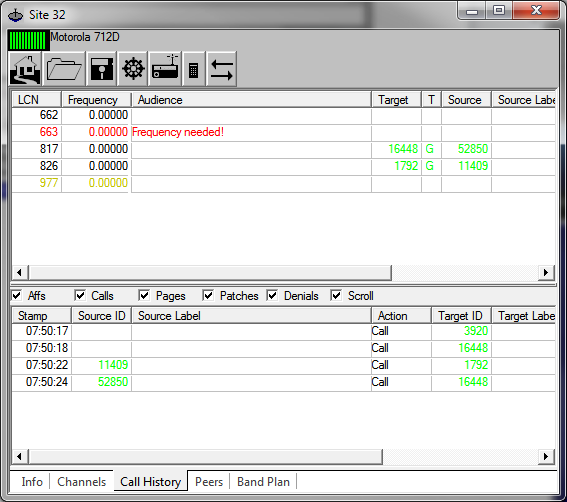
Close this window, and the site window should now look like this:
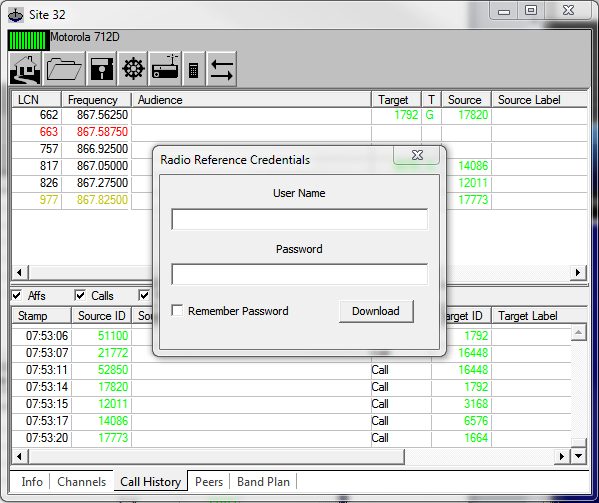
2.1.4.2 Populating Trunk Group Names with RadioReference.com (optional)
If you have a Radio Reference account, you can download the Trunk Group names by clicking the ship wheel and entering your credentials:
Once complete, you should be able to click ‘Systems’ in the main UniTrunker channel and see something like the following:
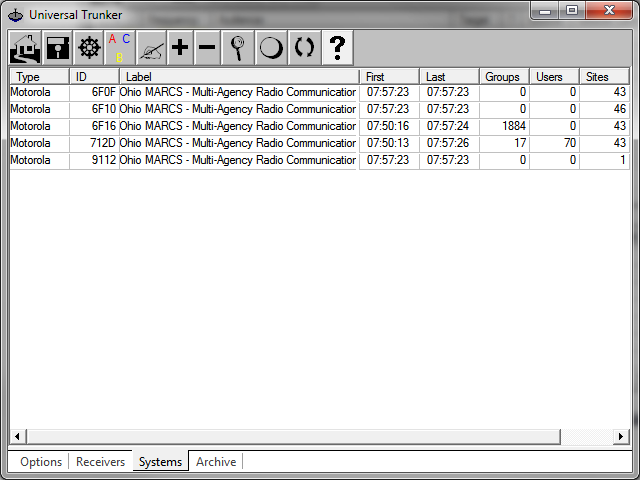
Note the ‘Groups’ should be populated with a reasonably high number (>50).
IMPORTANT: In my specific case, the groups are for system ID 6F16, but my site is 712D. This prevents my calls from being tagged with the appropriate trunk group. I ‘Stop’ my signal receiver, delete the 712D system, then double click on the 6F16 system and change the ID to 712D. Close that window, then re-start the receiver. This works.
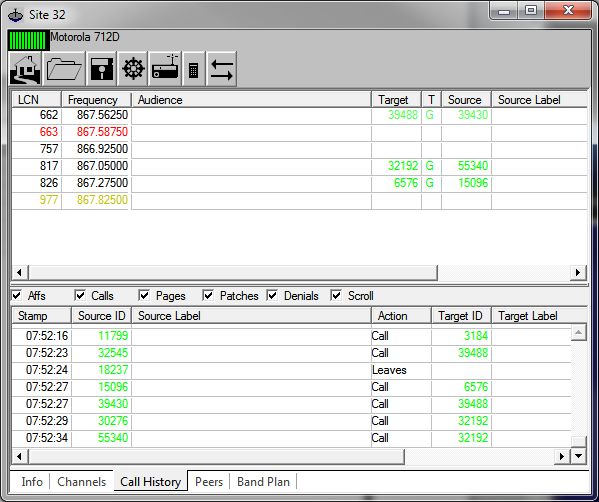
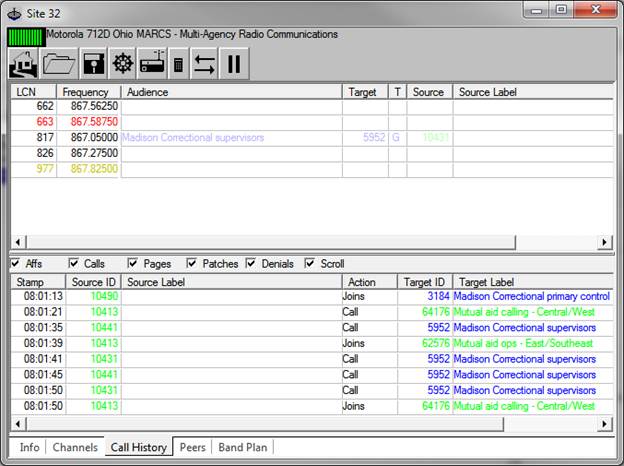
The calls should now be tagged correctly:
2.1.4.2.1
Control Reciever
With this in place, select the control receiver in the main unitrunker window and click Play to ensure it is running. Open the receiver, and scroll to the bottom:
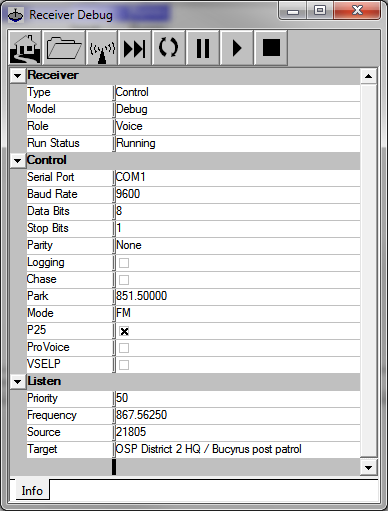
The ‘Listen’ section should be dynamically updated with calls as they come in. If the Radio Reference support is not available, Target will simply be the trunk group ID. If it is stuck in ‘Park’, then check to ensure the correct checkboxes are enabled above ‘P25, ProVoice, VSELP’, or just check them all.
The final step is to CROSS YOUR FINGERS and look in the UniTrunker home directory with Windows Explorer. You should see a small file called ‘sdrsharptrunking.log’. This is the ‘control file’ used to drive SDRSharp, and it should be getting updated with the information from the Listen section in the Debug receiver. If the file does not exist, make sure that remote.dll is in the home directory.
The content will look something like this:
action receiver frequency trunkgroup trunklabel
Listen Debug 867562500 3184 Madison Correctional primary control
2.1.5
SDRSharp
Control Radio
This is where the second dongle comes in to play with this configuration.
Start a second copy of SDRSharp and select the correct front end. If you are using two RTL2832U dongles, the one in use will be skipped automatically.
2.1.5.1
Calibrating
the Tuner
Because this instance will be tuned programmatically, it is essential that the tuner be correctly calibrated (especially in the case of the RTL2832U). The simplest way to do this is to tune to the control channel frequency by typing the value into the ‘Center Frequency’ and ‘Frequency’ boxes. You may see something like this (zoomed in, minus the label in the spectrum analyzer unless you’ve also loaded a frequency CSV file in the auto tuner section)
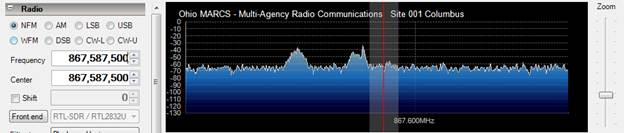
Note the control channel is wide left of the tune point. Click front end and adjust the PPM value in the bottom right until it is as perfectly centered as possible:

(Note: You may need to scroll down to the Display section and bump up the FFT resolution (16k or so) to get a good idea of where the edges of the signal are).
2.1.5.2
Analog
Voice Audio Configuration
There isn’t much to do here. Ensure that the Output is set to your speakers. This copy of SDRSharp will attempt to save settings and this one will tend to overwrite between the two copies. Also, ensure filter audio is checked or you’ll get a bunch of extra noise.
2.1.5.3
Digital
Voice Audio Configuration
For this one, select the default recording device Virtual Audio Cable audio port. Ensure that Filter Audio is unchecked.
2.1.5.4
UniTrunker
Configuration
Scroll down to the UniTrunker panel, check the box, click File and browse to the UniTrunker Install Directory.
NOTE: The code
currently makes the poor assumption that you’re running UniForm.exe directly
from the install directory. If you run
it from the shortcut, you will find these files in your %AppData%
directory, typically C:\Users\<username>\AppData\Roaming\UniTrunker. This is the folder you need to select, and
because it does not see UniForm.exe or Remote.dll in the same directory, it may
complain. Ignore that.

Once these are in place, SDRSharp should start taking commands from UniTrunker and tune to the appropriate frequency. For analog voice channels, nothing else should be required. For digital voice channels, additional work may be required to get DSD to decode properly.
2.2
Single
Receiver Configuration
It is possible to do trunking with a single receiver, but with two caveats:
Digital Voice Only – Not a technical limitation, but a practical one. Because all audio goes to a single output channel, the analog voice would be mixed in with the digital control channel, which would only be bearable for a small amount of time. Fine for testing though.
Longer Delays Between Calls – Because UniTrunker will not be getting control channel information while the radio is tuned to the voice channel, it will require about 7 seconds of initialization time after every call.
2.2.1
Configuration
The configuration is essentially the same, except all of the SDRSharp configuration is done with the same instance of the application.
2.2.1.1
Audio
Audio must be routed to the default recording device so that DSD will pick up the digital voice channels and UniTrunker will pick up the control channel on the same audio channel.
2.2.1.2
UniTrunker
Lock Mode
Configure the Lock Mode in the Signal Receiver to ‘Dedicated’ or you will get AdHoc Site popups every time the tuner returns to the control channel
2.2.1.3
UniTrunker
Control Receiver
Configure the Park frequency to the control channel frequency (in MHz).
2.2.1.4
SDRSharp
UniTrunker Panel
Because UniTrunker loses the signal immediately after tuning to the voice channel, it will ‘Park’ the control receiver. We must ignore this specific command or you will only get about a second of audio on each voice call.
To do this, click ‘Delay Re-Tune’ checkbox, and set the (db) level to something midway between the noise floor and peak level of the voice channel signals.
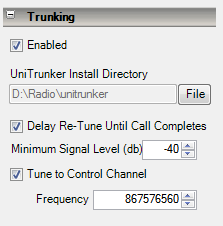
Checking ‘Tune to Control Channel’ will cause this instance to tune to that frequency when no information is available from UniTrunker.